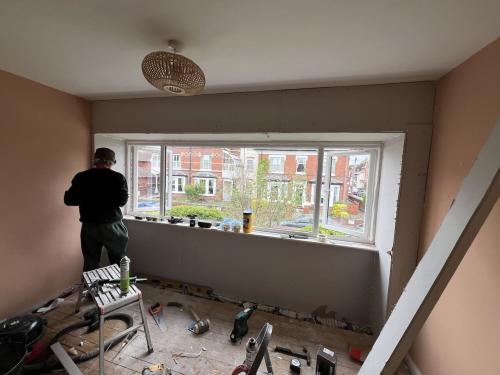
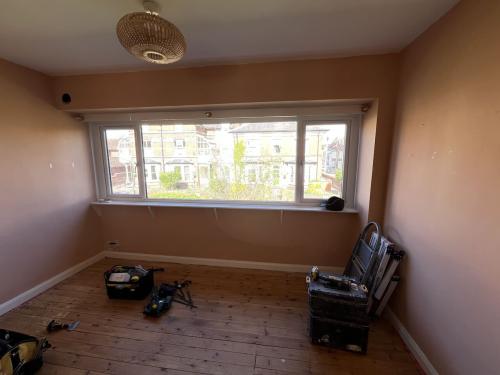
Laura has lived in her 1960s semi-detached home in Hereford for around five years. She plans to stay long-term, wants to lower her bills and cut her carbon footprint, and has one eye on eventually switching to a heat pump. For now, the priority was getting the house ready — and sorting out one persistent problem: her daughter’s bedroom was always the coldest room in the house.
With a budget of around £5,000 to improve her home, Laura applied to the Future Ready Homes programme and received a whole-house retrofit assessment from Gervase Mangwana of Waxwing Energy. What he found — and what it took to fix — is a essential learning for anyone living in a similar home across Herefordshire.
Does your home look like this?

Laura’s home is a 1963 cavity-wall semi. Many homes built in the 1950s, 60s and 70s share a feature you may not have given much thought to: a wide, timber-framed infill panel between the ground floor and first floor windows. It’s found across the whole county — on streets in Hereford, Leominster, Ross-on-Wye and beyond. Some houses have it on the front only; some front and back. The cladding varies — vertical or horizontal timber, tiles, render, or uPVC replacement panels. But the structure underneath tends to be the same: a timber frame with no meaningful insulation and nothing to stop draughts.
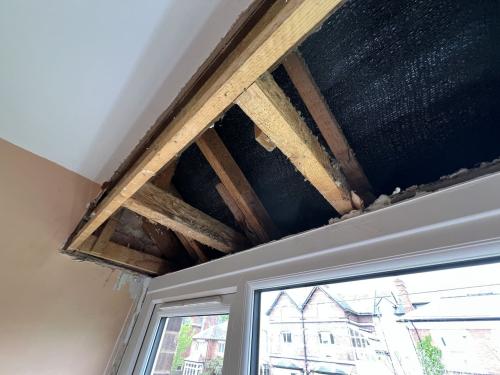
In Laura’s house, the timber frame above the large upstairs bedroom window connected directly into the ventilated roof space — giving cold air an essentially unobstructed route into the room. The upstairs window itself was also large and poorly fitted — replacing it was one of the first things identified as part of the retrofit assessment.
What the assessment involved
What sets a whole-house retrofit assessment apart is the depth of picture it builds. Gervase spent time understanding the home in detail — its construction type, heating system, where heat was being lost, what the building fabric was made of, and how Laura actually lived in and heated the house. This produced a written report with modelled heat loss figures, costed recommendations, and projected improvements.
Alongside the assessment, Gervase carried out an air pressure test — and this is where things got interesting.
Laura’s house scored 9.4 m³/m².h — around the UK average for homes of this age, but with clear and identifiable causes. The carpet-lifting pointed Gervase towards the party wall. Laura had already had the main cavity walls filled with polystyrene bead since moving in, but the wall shared with the neighbouring property turned out to be a 75mm cavity that had never been treated. And the timber-framed infill panel at the front, as he had suspected, was the other major weak point.
What is an air pressure test — and why does it matter?
A blower door is a powerful fan sealed into an external doorway. It depressurises the house to a standard pressure, which draws air in through every gap, crack and unintended opening in the building fabric. The total airflow needed to maintain that pressure gives a score — air permeability, measured in m³/m².h — that tells you how leaky the building is. The lower the number, the better.
But the score is only part of the value. With the fan running, you can walk around and feel — or see, using a smoke pen or thermal imaging camera — exactly where air is getting in. Cold spots, draughts, gaps around window frames, open floor voids: the test makes the invisible visible.
In Laura’s case, the test revealed something unexpected. In a back bedroom, the carpet started lifting off the floor — air was being drawn up through the floorboards from below, pointing directly to a significant and hidden leakage path.
What was recommended — and what Laura decided to do
The assessment identified several areas for attention: the party wall cavity, the infill panel and windows at the front, and some general draught-proofing. Given the £5,000 budget, Laura decided to focus on the front of the house — replacing the two worst-performing windows (upstairs bedroom and downstairs living room) and tackling the infill panel properly. The party wall would come later.
Gervase returned to do further investigation before finalising the design — probing the panel construction carefully to understand what he was working with before committing to an approach. That investigation is what made the difference between a job done quickly and a job done right.
Cavity party walls: unusual, invisible — and worth knowing about
Most party walls in homes of this era are solid brick or block. Cavity party walls are less common, but they do exist and when they’re unfilled they can cause significant heat loss and air leakage — because the cavity connects to the floor void and other parts of the building.
The problem is you can’t see one from inside the house. This is exactly where an air pressure test earns its value. When the blower door was running in Laura’s house, the carpet in a back bedroom started lifting — air being drawn up through the floorboards from the cavity below. Without the test, that party wall could have remained undetected and unfilled indefinitely.
Filling a cavity party wall is possible, but requires a party wall agreement with the neighbour and needs to be done from inside the property.
What was behind the wall
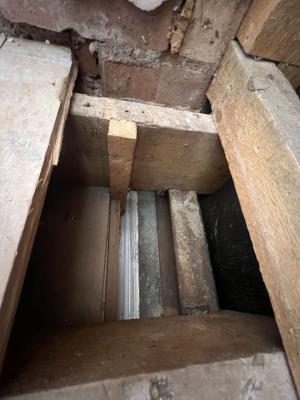
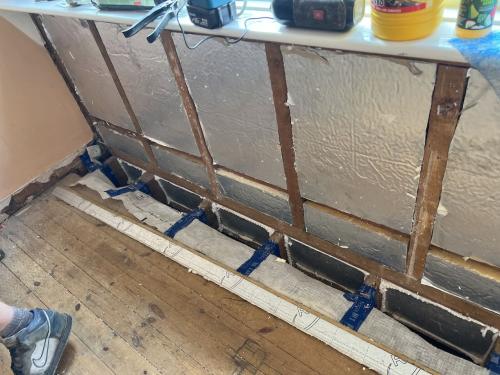
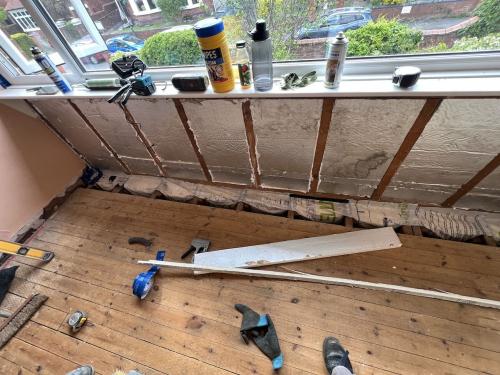
When the panel was opened up, it confirmed what Gervase had expected: a timber frame with nothing behind the plasterboard. No insulation. No airtightness layer. Open connections to cold ventilated spaces both below and above the window.
The new windows had been fitted by a window company just before Gervase began the retrofit work — standard practice, but the installer had filled the large void above the window with expanding foam that had failed to adhere properly. Gervase removed it in strands. The airtight connection between window and structure still needed to be made.
“I’d never really given the wall a second thought. But once Gervase opened it up and showed me what was — or wasn’t — in there, I was shocked. Suddenly it was completely obvious why we’d struggled to keep that room warm.” — Laura, homeowner
Why this wall needed a different approach
Laura’s house is cavity-wall construction — and for most of it, fairly standard retrofit thinking applies. The main walls have been filled, and modern materials and methods work well. But that timber-framed infill panel is a completely different type of construction, and it needs to be treated as such.
Timber frame is traditional construction: it needs to breathe, or at minimum, moisture needs to be carefully managed within the structure. Add the wrong materials, or create the wrong conditions, and you can trap damp against the timber, causing damage that won’t show up for years. This panel had survived sixty years precisely because it was heavily ventilated — cold air moved through it freely, which kept the timber dry. Any intervention had to improve insulation and airtightness without removing the conditions that had kept the structure safe — and doing that required a specific set of principles applied carefully on site.
What was done — and the thinking behind it
Gervase’s solution was shaped by several things at once: Laura’s budget, her preference for minimal disruption to the exterior, the need to protect the timber frame, and the construction realities he found on site. There is no single template for a job like this. The approach came from applying a set of principles to the specific situation.
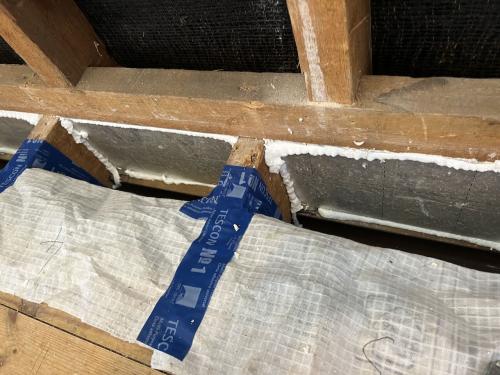
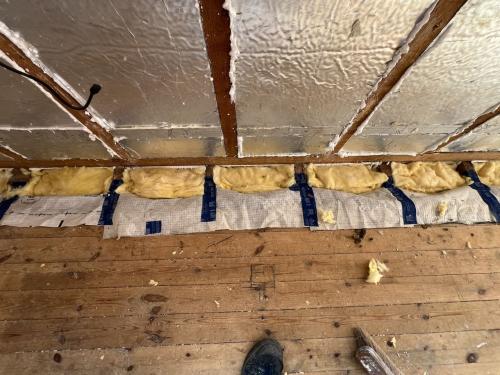
The first principle was maintaining a ventilated gap. Rather than filling the timber frame bays completely, the insulation was fitted leaving a 25mm gap between the back of the boards and the outer face of the frame. This preserved the ventilation path that had kept the timber dry, while dramatically reducing the cold air volume in contact with the room.
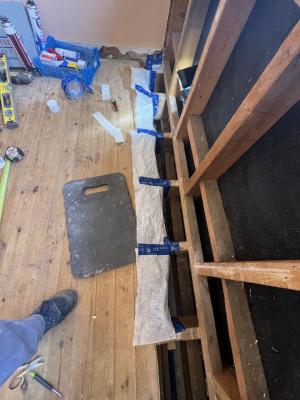
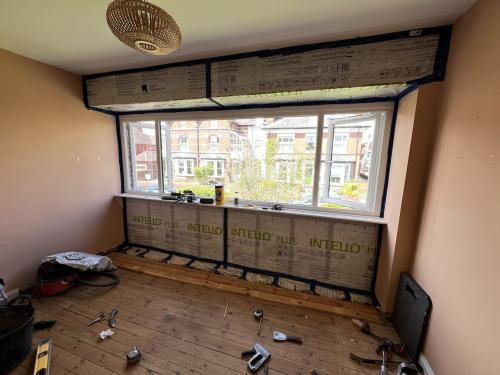
The second principle was creating a continuous, unbroken airtight layer across the entire area — below the window, above the window, and connecting to the walls, ceiling and floor junction. This is the part that requires patience and skill. Every junction, corner and bay had to be taped and sealed so there were no gaps for air to bypass the membrane. Gervase used Intello Plus — a professional-grade airtightness membrane — taped throughout with Tescon tape, working section by section. Above the window, where the frame had connected to the roof space, 40mm insulated plasterboard was applied and sealed into the same continuous layer.
The third principle was eliminating cold bridges at the sides. The masonry piers flanking the window were significantly colder than the surrounding wall, so these were also insulated and wrapped into the layer.
A word on materials: Gervase used PIR rigid foam board for the insulation. In a timber-frame context, vapour-open materials like wood fibre are generally preferred — more forgiving of any moisture that gets in. In an ideal-budget job, that’s what would have been used. But wood fibre render boards plus breathable infill would likely have doubled the cost and the time on site. The PIR was available, the budget was tight, and crucially, the ventilated gap behind it meant the timber remained able to dry. A deliberate, informed decision within real constraints — not a shortcut.
There was also a moment mid-job where Gervase noticed that a horizontal noggin within the frame was blocking the ventilation from moving above and below. He drilled holes through it to restore the ventilation path. It’s a small thing, but it illustrates something true about this kind of work: you cannot fully plan it in advance. You have to understand construction well enough to respond to what you find when you get there.
The whole job took four days on site. Laura took on the redecoration — filling, sanding, painting — which kept costs down and gave her ownership of the finished result.
The result
After the work was complete, the house was retested. The air leakage had gone down from 9.4 m³/m².h to 5.9 — a 37% improvement. This came from the combination of the insulated and sealed infill panel, the two new windows, and some additional draught-proofing measures Laura had done herself. The back of the house remained largely untreated throughout.
Gervase’s honest reaction: he was amazed — 5.9 was well beyond what he expected.
The daughter’s bedroom — previously the coldest room in the house — now has the best-insulated wall in the building.
Laura noticed the difference almost immediately and expects the full benefit to show this winter. For her, the experience confirmed something she’d go on to say to anyone considering similar work: that meaningful improvements are achievable for a modest budget, if you approach it the right way.
At a glance
| Windows (two, front of house) | £2,000 |
| Labour and materials — insulation, membrane, taping (four days on site) | £2,500 |
| Total | under £5,000 |
| Air permeability before | 9.4 m³/m².h |
| Air permeability after | 5.9 m³/m².h (37% improvement) |
For context: the notional new build airtightness target under Part L 2021 is 5 m³/m².h, tightening to 4 m³/m².h under the Future Homes Standard. Laura’s house is now approaching new build territory — from targeted work on one wall and two windows.
What’s next
The party wall cavity is still unfilled. A surveyor has confirmed it’s feasible, and Laura is moving forward with the party wall agreement. When that work is done, the airtightness score should improve further still — and the house will be well placed for a heat pump.
Gervase’s assessment modelled the full effect of the fabric improvements alongside the new windows. The projected heat demand reduction is around 20%, and the peak heat load — which determines the minimum heat pump size the house would need — has dropped from 7.6kW to under 6kW. A smaller, better-matched system when the time comes.
Laura’s current boiler is a Viessmann Vitodens condensing combi. As the house gets more airtight, the flow temperature can come down, making it run more efficiently in the meantime — buying time before the eventual switch to a heat pump makes sense. When that point comes, government grants are available for replacing a gas boiler with a heat pump. Check current figures at gov.uk.
What Laura’s story tells us
You do not need to do everything at once. A whole-house assessment tells you where to focus. Targeted work in the right place — done properly — can deliver results that surprise even the person carrying out the work.
The caveat is important: done properly. Replacing the windows was the obvious first step, and for many people it would have felt like enough. But the improvement here did not come from fitting new windows and hoping for the best. It came from someone who understood what was behind the wall, knew how to treat it safely, and made every junction airtight. That knowledge is what turned £2,500 of labour and materials into a 37% improvement.
If you have a room that never quite warms up, it is worth finding out why before spending another winter turning the heating up.
“I felt I was in very safe, knowledgeable hands with Gervase throughout — from the assessment right through to the work itself. He listened, explained his findings clearly, and kept me informed at every stage. I’d encourage anyone to get an expert in to look at their house and advise them on where they can make improvements.” — Laura, homeowner
Is your house similar?
If you live in a semi-detached or terraced house built in the 1950s, 60s or 70s — in Hereford, Leominster, Ross-on-Wye or anywhere across the county — look at the front of your house. Is there a band of cladding between your ground floor and first floor windows? If so, it may well be a timber-framed infill with little or nothing behind it. You won’t know until someone investigates.
A whole-house retrofit assessment is the place to start. It tells you not just what to do, but why, in what order, and what’s realistically achievable within your budget.
Marches Energy Advice maintains a directory of local retrofit assessors and installers across Herefordshire. Find it at www.mea-directory.org.uk